
Tissue Paper Candle Holders
Materials:
Tissue Paper
Pinking shears or scissors
Glue
Wide paint brush
Hurricane glass or other candle holder
Directions:
1. Cut strips of tissue paper of varying heights, but all the same length (a bit longer than the candle holder/vase you will be using)
2. Fold strips accordion style, and cut out shapes on the fold, such that the shape repeats itself across the strip once unfolded.
3. Layer strips such that contrasting colors appear within the cut out shapes. Adhere with glue.
4. Wrap around candle holder/vase and smooth a thin layer of glue on top to adhere and make it shine.
Adapted from creativejewishmom.com
Stained Glass Menorah
Materials: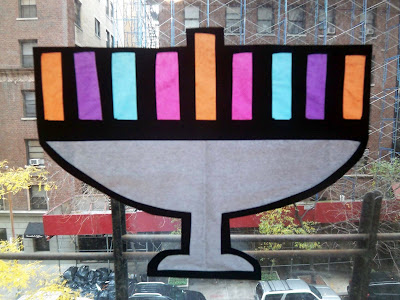
Black construction paper
Craft knife
Silver tissue paper
Colored tissue paper
Glue Stick
Directions:
1. Draw an outline of a menorah and candles on a piece of black construction paper with a white or light colored pencil. Then cut out the candles and the menorah with a craft knife.
2. Cut rectangles of silver tissue paper that will fit behind the cutout menorah and cut pieces of colored tissue paper that will fit behind the cutout candles.
3. Using a glue stick glue the tissue paper to what will be the backside of the stained glass. Make sure that you put glue around the cut outs so that when you trim the paper your tissue paper will stayed glued to the construction paper.
4. Cut off the excess black construction paper leaving a border of black construction paper approximately 1/4 inch.
5. Hang in a window and let the light shine!
Adapted from upperwestsidemom.com
Chanukah Mitzvah Calendar
Hanukkah is called the "Festival of Lights" for the candles that kept glowing for eight nights when they light was so desperately needed-- it was a miracle they lasted that long. So what better way to celebrate this miracle than to try and spread a little light in our own lives? Here's a simple calendar with some ideas for mitzvahs (good deeds) for each day of this special holiday.
Materials: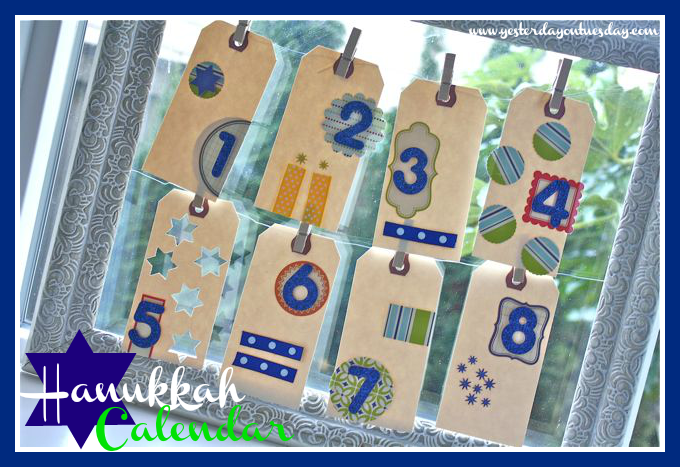
Old picture frame
Wire
Tiny clothespins
Various craft punches
Scrap paper and ribbon
Number stickers
Stickers of your choice
8 shipping tags
Directions:
1. Decorate the tags with Hannukah in mind, using traditional colors of blue and silver and symbols include the Star of David, menorahs, and dreidels
2. Mark each tag with a number so there is one for each day
3. That number corresponds to some way to "bring light" to others on the back
4. On the back of each card write each mitzvah - some ideas are below, but feel free to create your own that will resonate with your family
5. Hang two rows of wire inside the picture frame
6. Attach the shipping tags to the wire using the clothespins
7. Each night of Chanukah look at that night's tag and discuss how you will achieve that mitzvah tomorrow
Mitzvahs for Each Day/Night of Chanukah
Day 1: Write one letter to someone who has made a difference in your life… and send it
Day 2: Really listen to two important people if your life– without judging or interrupting
Day 3: Do three nice things… anonymously!
Day 4: Notice the big and small things four people do for you today and thank them
Day 5: Give a compliment to the first five people you see
Day 6: Share six smiles. Look the person in the eye and smile with kindness, encouragement, and love
Day 7: Go through your things and donate seven toys to less fortunate kids
Day 8: Gather donations from friends and neighbors and deliver eight bags of non-perishables to the food bank
Adapted from yesterdayontuesday.com
Upcycled Menorah
Materials: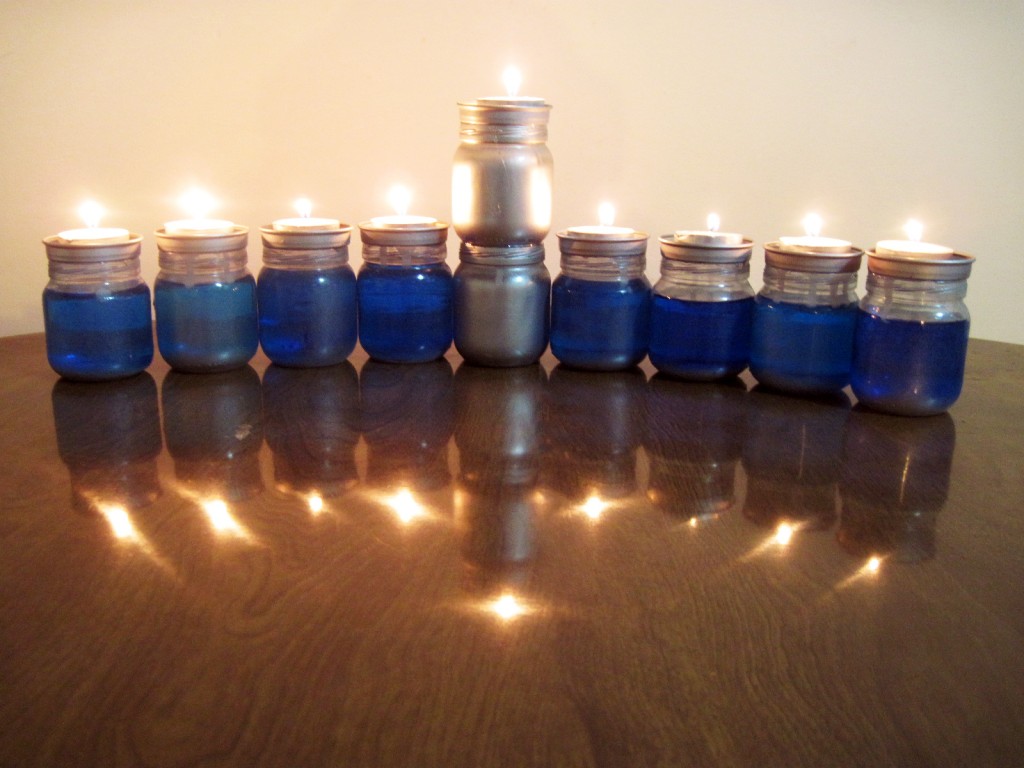
10 4 oz. baby food jars
9 baby food jar lids, cleaned and dried.
Blue food coloring (food color gel works best)
E-6000 glue/transparent craft adhesive
Silver spray paint
Tea lights (9 or a total of 44 for all of Hanukkah)
Water
A spoon for stirring
Directions:
1. Start by spray painting all your lids silver, making sure the insides and the outer rims are completely covered.
2. Arrange eight of the jars upside down on your painting surface. Spray the paint from the bottom up, so that it is completely covered on the bottom, with a subtle shimmer going upward.
3. Spray paint the last two jars completely silver. These will make up your Shamash (helper candle).
4. Place a few drops of food coloring inside your jar (depending on the brand, and how deep you want the color to be). Cover with water.
5. Mix it so that the color is evenly distributed.
6. Apply glue around the rim of the jar.
7. Secure the lids upside down on the baby food jar. Allow to dry 24 hours before relying on it to stay.
8. Apply glue around the rims of your two silver jars.
9. Place the one jar on top of the other upright. Place the last lid on top of the top jar upside down
10. Arrange your upcycled menorah in straight row and light it up!
Adapted from momandcrafters.com
Handprint Menorah
Materials: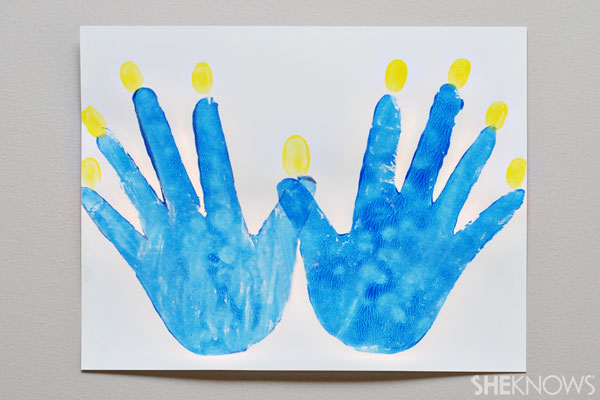
Cardstock
Blue paint
Yellow paint
Directions:
1. Dip your child's hands in the blue paint.
2. Make two hand prints on the card stock, overlapping the thumbs to form the menorah.
3. Wash your child's hands.
4. Have your child dip his thumb in the yellow paint. Put a yellow thumb print at the top of each blue finger to make the "flame" for the hand print menorah.
Adapted from sheknows.com
Flip Your Latke Craft
Materials: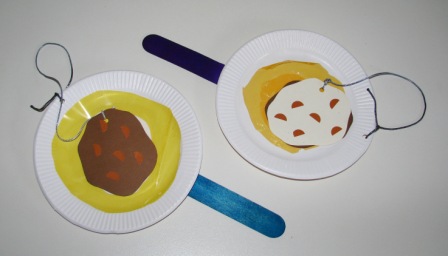
Small paper plates
Extra large popsicle sticks (tongue-depressor size)
Sticky tape
Yellow cellophane, or anything else that can represent oil
Brown and/or cream cardstock
Brown spot stickers cut in half
String
Directions:
1. To make the frying pan, adhere the extra large popsicle stick to the base of a small paper plate using the sticky tape.
2. Cut yellow cellophane into a squiggly round shape to represent the oil in the pan.
3. Stick the yellow cellophane to the center of the plate with glue or sticky tape.
4. Cut out two latke shapes – if you use a combination of colors, it’s easier to see whether or not you flipped it over when you tossed it. Stick together slightly offset with glue, and decorate with brown spot stickers to make it look like pieces of potato.
5. Punch a hole into both the frying pan and the latke, and tie a piece of string to both, so that your latke is much harder to lose.
6. Practice your latke tossing skills!
Adapted from joyfuljewish.wordpress.com